Komunitas Fotografer Tanjung Pinang (KFT)

Foto diatas logo komunitas fotografer yang ada di Tanjungpinang, KEPRI INDONESIA.

Hasil Potret By Willy Sukamoto

Foto diatas adalah hasil dari salah satu anggota Komunitas Fotografer Tanjungpinang (KFT)

Selamat natal 2012

Info-Motret mengucapkan selamat tahun baru natal 2012

Hasil Foto By TL Photography

Foto yang diambil di PEKANBARU

info motret

http://info-motret.blogspot.com

Featured Posts Coolbthemes

Rabu, 20 Februari 2013

membuat efek lampu lens flare di photoshop

Hi sobat info-motret, kali ini admin akan menjelaskan bagaimana caranya membuat efek lampu lens flare di photoshop. tapi kali ini admin akan menjelaskan dengan bahasa inggris, biar standard internasional ni sekali-sekali heheh. baiklah mari kita mulai .


Photoshop lens flare effect. Image © 2010 Photoshop Essentials.com.

Step 1: Apply The Lens Blur Filter

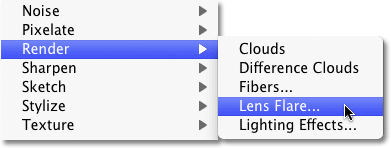
With our image open in Photoshop, the first thing we need to do is add a lens flare the way we normally would if we were applying it directly to the image. Even though we’re going to be undoing the effect, this gives us a chance to position the lens flare exactly where we want it. To add a lens flare, go up to the Filter menu at the top of the screen, choose Render, and then choose Lens Flare:
Selecting the Lens Flare filter in Photoshop. Image © 2010 Photoshop Essentials.com.
Go to Filter > Render > Lens Flare.
This opens the Lens Flare dialog box. Photoshop’s Lens Flare filter adds a simulated lens flare effect to the image, and we can choose from one of four different types of lenses (50-300 mm Zoom, 35mm Prime, 105mm Prime, and Movie Prime) in the Lens Type section at the bottom of the dialog box. Each one will give us a different type of flare. Select each one to view the effect in the preview area in the top half of the dialog box. I’m going to stick with the default 50-300mm Zoom lens. You can also adjust the brightness of the lens flare by dragging the Brightness slider left or right, but again, I’ll stick with the default 100%.
To position the lens flare where you want it, simply click inside the preview area. The spot you click on becomes the center of the flare. I’m going to click directly on the setting sun just above the people walking on the beach:
The Lens Flare dialog box in Photoshop. Image © 2010 Photoshop Essentials.com.
Click inside the preview area to set the position of the lens flare.
When you’re happy with the type and position of your lens flare, click OK to exit out of the dialog box. Photoshop will then apply the 
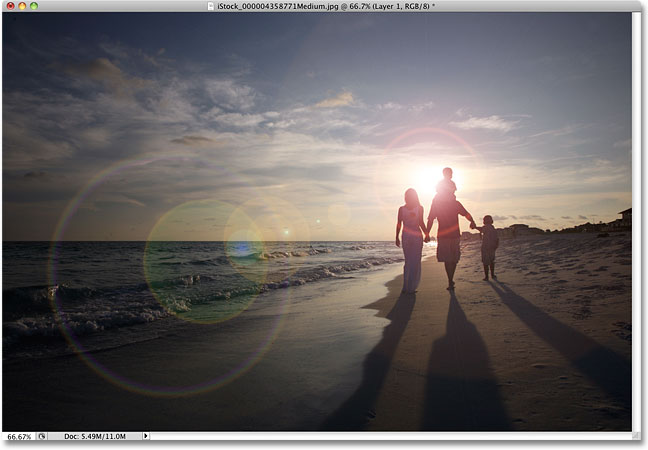
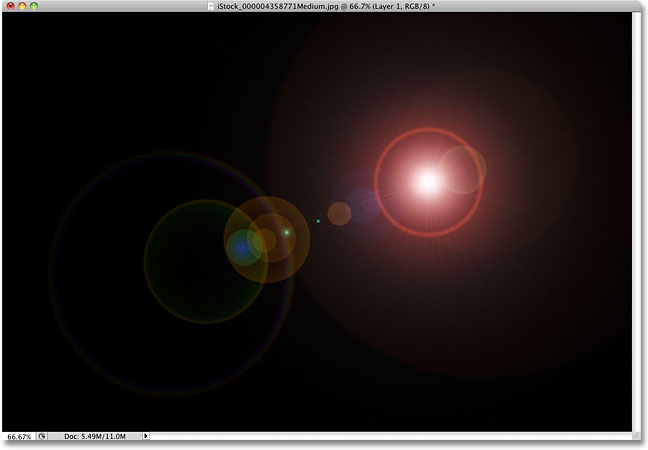
effect to your image in the document window. Here’s what my lens flare looks like:
The initial Photoshop lens flare effect. Image © 2010 Photoshop Essentials.com.
The initial lens flare effect.
The only problem is, we’ve just applied the lens flare directly to the image itself. If I was to save the image at this point and close out of it, the original photo (without the lens flare) would be gone forever, and that’s not the way you want to work in Photoshop, especially when we can create the exact same effect non-destructively using blend modes!

Step 2: Undo The Lens Flare

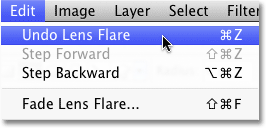
Now that we know exactly where we want the lens flare to appear in the image, let’s undo the effect by going up to the Edit menu at the top of the screen and choosing Undo Lens Flare. Or, a faster way to undo the effect is to press Ctrl+Z (Win) / Command+Z (Mac) on your keyboard, which will undo the last step:
Undoing the Lens Flare filter effect. Image © 2010 Photoshop Essentials.com.
Go to Edit > Undo Lens Flare, or press Ctrl+Z (Win) / Command+Z (Mac).

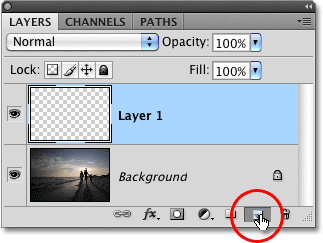
Step 3: Add A New Blank Layer

Click on the New Layer icon at the bottom of the Layers palette. Photoshop will add a new layer named “Layer 1″ above the Background layer (which is the layer our image is sitting on):
Clicking the New Layer icon in the Layers palette in Photoshop. Image © 2010 Photoshop Essentials.com.
Add a new layer above the Background layer.

Step 4: Fill The New Layer With Black

Photoshop won’t allow us to apply the Lens Flare filter to a blank layer, so let’s fill the layer with a color. We’ll use black, which will make it easy to blend the lens flare into the image later. Go back up to the Edit menu and this time, choose Fill:
Selecting the Fill command from the Edit menu in Photoshop. Image © 2010 Photoshop Essentials.com.
Go to Edit > Fill.
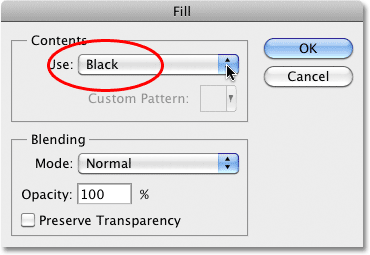
When the Fill dialog box appears, set the Use option in the Contents section at the top of the dialog box to Black:
The Fill command dialog box in Photoshop. Image © 2010 Photoshop Essentials.com.
Set Black as the color you want to fill the layer with.
Click OK to exit out of the dialog box. Photoshop fills the new layer with black, which fills the document window with black, temporarily hiding the original photo from view.

Step 5: Re-Apply The Lens Flare Filter

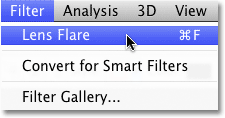
Now that the layer is no longer blank, we can re-apply our Lens Flare filter. Photoshop still remembers all of the settings we used for the filter the last time we applied it, including the flare’s position, so all we need to do is re-apply it. Since the Lens Flare filter was the last filter we used, we can quickly re-apply it simply by going up to the Filter menu and choosing Lens Flare at the very top of the list. Or, for an even faster way to re-apply the last filter you used, simply press Ctrl+F (Win) / Command+F (Mac) on your keyboard:
Re-applying the Lens Flare filter. Image © 2010 Photoshop Essentials.com.
The previously used filter always appears at the top of the filter menu so we can re-apply it easily using the same settings.
The same lens flare appears in the same position in the document window, this time on Layer 1 rather than on the image itself:
The lens flare has been applied to the solid black layer. Image © 2010 Photoshop Essentials.com.
Space. The final frontier. These are the… oh, uh, sorry about that.

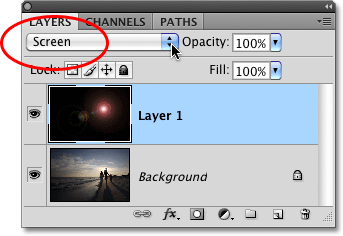
Step 6: Change The Layer Blend Mode To Screen

All we need to do now is hide all of the solid black on the layer and blend the lens flare into the image below it, and we can do that easily by changing the blend mode for Layer 1 from Normal to Screen. You’ll find the blend mode option in the top left corner of the Layers palette:
Changing the blend mode of Layer 1 to Screen in Photoshop. Image © 2010 Photoshop Essentials.com.
Change the blend mode for Layer 1 to Screen.
With the blend mode set to Screen, all of the solid black on Layer 1 disappears, leaving only the lens flare itself and giving us the exact same effect we had initially, only this time, its on a separate layer:
Photoshop lens flare effect. Image © 2010 Photoshop Essentials.com.
The same lens flare effect has been applied without harming the original photo.
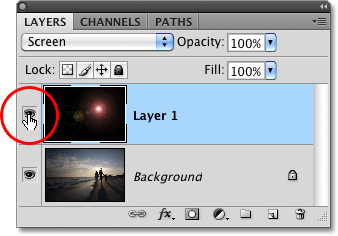
Since the lens flare is now on a separate layer above the image, we can turn it on and off just by clicking the layer visibility icon (the eyeball) on the far left of Layer 1. Click it once to turn the lens flare off. Click it again to turn it back on:
The layer visibility icon for Layer 1 in Photoshop. Image © 2010 Photoshop Essentials.com.
Click the layer visibility icon to show or hide the lens flare in the document window.

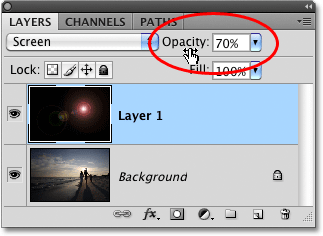
Step 7: Lower The Opacity Of The Lens Flare (Optional)

Another benefit to having the lens flare on its own layer is that we can reduce its intensity if needed by lowering the opacity of Layer 1. You’ll find the Opacity option directly across from the blend mode option at the top of the Layers palette. The lower you set the opacity, the more subtle the lens flare will appear in the document:
Lowering the opacity of the lens flare. Image © 2010 Photoshop Essentials.com.
Lowering the opacity of Layer 1 reduces the intensity of the lens flare.
Here, I’ve lowered the opacity to 50%, giving me a much more subtle flare effect:
A more subtle flare effect.
Make sure you save the image as a Photoshop .PSD file when you’re done to keep the layers intact in case you ever need to go back to the original image without the flare effect. And there we have it!

Smudge Painting sederhana dengan Photoshop

Smudge Painting sederhana dengan Photoshop

Selamat sore para para bloger :)......
kali ini saya akan berbagi tentang trick photo shop, yaitu Smudge Painting.....


Tutorial ini saya copy dari note seorang mastah Photoshop :) yang bernama "Baju Imaginer"....
baiklah , sekarang kita mulai ---:::::::::---


1. Pilih gambar/foto dengan resolusi yang mencukupi

2. Atur image size
image>image size ...dirubah 600 ( dengan harapan tdk terlalu berat saat diolah )
3. Atur Gambar / Foto
image>Level ..........Chanel RGB, Input Level : 0 / 1.59 / 255
image>adjustment>Brightness/Contrast........Brightnes : -43, Contrast : +7
4. Olah Foto dengan Topaz Adjust
Filter>Topaz Labs>Topaz Adjust>Enchange Contrast
Adaptive Exposure/Detail/Color/Noise : silahkan diatur sesuai selera
5. Gosok 1
Seluruh Bagian dari Gambar atau Foto , wajib digosok ( BG maupun Obyek utama )
Pilih Tool Standart Phothoshop Smudge Tool>mode Normal.
Ukuran : Background (BG) : Streght 15, Diameter
Kulit Wajah/Tangan/Leher : Streght : 7
Pakaian : Streght : 9
Mata/Bibir/Gigi/Alis/ Ornamen Pakaian : Streght : 1
Rambut : Streght : 1-2
Size Diameter disesuaikan dengan obyek yang akan digosok....
6. Atur Warna dengan NIC Color
Filter>NIK Sofware>Color Efex Pro 3.0 Complete>Bi Color User Defined
Opacity : 19 %
Blend : 64%
Vertical Shift : 37%
Rotation : 192'
Uper Color : R : 27 / G : 17 / B : 115
Lower Color : R : 130 / G : 85 / B : 8
Shadow : 0
Highlight : 0
Klik OK

7. Detail 1 dengan Topaz Vivacity
Filter>Topaz Vivacity>Topaz Clean (YcbCr)
Atur : Threshold : 7.02 / Clean Radius : 0 / Sharpness : 2.33

8. Gosok 2
Gosok seperti langkah Gosokan 1

9. Detail 2 dengan Topaz Vivacity
Filter>Topaz Vivacity>Clean
Atur : Threshold : 9,67 / Clean Radius : 4 / Sharpness : 2.08

10. Gosok 3
Gosok seperti langkah Gosok 1 & 2

Demikian yang saya lakukan dalam mengolah smudge painting.
Semoga Informasi ini bermanfaat. Apabila ada hal yang kurang & teman teman berkenan memberikan masukan,
saya siap untuk memperbaiki Tutorial ini.
Terima Kasih......~ salam ~

Membuat effect Splash atau Cat Tumpah dengan photoshop

Membuat effect Splash atau Cat Tumpah dengan photoshop


Assalamualaikum wr… wb….
Setelah lama nganggur ini blog, admin kembali memposting berita tentang info motret, kali ini info motret akan menjelaskan cara membuat effect splash dengan photoshop.
Saya sangat memohon maaf, karena tutorial ini sudah lama di pesan, tp belum bisa saya buat. 
Terima kasih buat bro Arisk Danker is back yang sudah memperbolehkan saya untuk membuat ulang tutorial ini….. 
Sebelum membuatnya silahkan download file berikut:
Splash effect : download disini( Exstract filenya)
Sont pepsi :Download disini (install font nya)
Langsung ajah kita mulai :

 Gambar A
 Pertama kita buka dahulu photoshop dan setelah itu kita buat layer baru dengan background hitam dan untuk size saya gunakan ukuran :
Width : 2000 pixel
Height : 2500 pixel
C
olor mode : RGB color 8 bit
 

 Gambar B
Selanjutnya saya klik layer "spalsh effect, dan disitu saya mau menyamakan warna yang ada dengan splash tersebut dengan cara klik eyedropper tool, dan saya pilih bagian warna yang seperti ini


 Gambar C
Selanjutnya saya klik layer "spalsh effect, dan disitu saya mau menyamakan warna yang ada dengan splash tersebut dengan cara klik eyedropper tool, dan saya pilih bagian warna yang seperti ini


Gambar D

Dan setelah sudah memilih warna yang diinginkan selanjutnya gambar tersebut di drag ke layer baru tadi yang warna hitam dengan move tool, seperti ini


 Gambar E
Selanjutnya kita menulis sebuah huruh dengan font "pepsi" seperti ini dan untuk size di sesuaikan saja....


Gambar F

Dan setelah itu huruf tersebut di geser mendekat ke splash effect tersebut dengan "move tool" seperti ini


Gambar G
Langkah selanjutnya adalah menyatukan antara huruf dengan splash efek tersebut dengan huruf dan caranya sebagai klik menu clone stamp tool, dan klik brush tool standar dan diameter disesuaikan dengan kebuthan berikut opacity juga di sesuaikan agar tidak terlalu terang, dan bila sudah tekan tombol keyboard alt + klik tombol kiri mouse lalu pilih bagian warna yang diperlukan dan setelah itu dilepas, kemudian klik satu persatu bagian tepi huruf tersebut agar terlihat menyatu dengan spalsh effect, seperti ini hasilnya.


Gambar H
Satu huruf telah selesai, dan untuk huruf selanjutnya juga sama seperti dari awal yang saya buat ini, dan akan saya coba lagi biar lebih jelas.

Selanjutnya saya klik layer "spalsh effect, dan disitu saya mau menyamakan warna yang ada dengan splash tersebut dengan cara klik eyedropper tool, dan saya pilih bagian warna yang seperti ini


Gambar I
Dan setelah sudah memilih warna yang diinginkan selanjutnya gambar tersebut di drag ke layer baru tadi yang warna hitam dengan move tool, seperti ini


Gambar J
Selanjutnya kita menulis sebuah huruh dengan font "pepsi" seperti ini dan untuk size di sesuaikan saja,lalu setelah itu huruf tersebut di geser mendekat ke splash effect tersebut dengan "move tool" seperti in, dan bila splash effect nya terlihat kekecilan bisa di besarkan dan sesuaikan dengan cara klik ctrl - t, lalu sesuakan secara manual


Gambar K
Langkah selanjutnya adalah menyatukan antara huruf dengan splash efek tersebut dengan huruf dan caranya sebagai klik menu clone stamp tool, dan klik brush tool standar dan diameter disesuaikan dengan kebuthan berikut opacity juga di sesuaikan agar tidak terlalu terang, dan bila sudah tekan tombol keyboard alt + klik tombol kiri mouse lalu pilih bagian warna yang diperlukan dan setelah itu dilepas, kemudian klik satu persatu bagian tepi huruf tersebut agar terlihat menyatu dengan spalsh effect, seperti ini hasilnya


  Gambar L
Dua huruf sudah selesai, dan untuk huruf selanjutnya juga sama seperti contoh diatas!!! singkat kata dan ini hasil dari tulisan yang ingin saya buat, dan ini semua sudah dalam proses kerapian, maksudnya menyama ratakan jarang masing masing huruf, gunakan movew tool.


  Gambar M
 Belum selesai sampai disini, langkah selanjutnya adalah, karena saya yakin ini 4 huruf sudah selaesai, dan saya akan menduplicate semua layer huruf dan splash yang saya gunakan tadi, dengan cara memblok semua layer tersebut setelah itu klik tombol kanan mouse, lalu akan muncul tampilan dan pilih duplicate layer > lalu klik OK
(fungsi duplicate yang saya gunakan ini untuk membuat efek shadow)


Gambar N
Setelah itu secara otomatis posisi layer duplicate dalam keadaan ngeblok semua, lalu selanjutnya klik tombol mouse ctrl - t lalu klik tombol kanan mouse lalu pilih "flip vertical"


 contoh hasil seperti ini


  Selanjutnya geser gambar tersebut digeser kebawah, seolah olah menjadi sebuah bayangan, seperti ini


Dan masih terlihat kasar, selanjutnya semua layer duplicate tersebut di pack menjadi 1 group, contoh seperti ini :
Klik tombol mouse kanan, lalu pilih group into new smart obyek, biar simple untuk proses selanjutnya.


 lihat tampilan ini


selanjutnya masih di layer group tersebut adalah langkah selanjutnya :

klik filter > blur > graussian blur > dan pilih radius 25 pixel > lalu klik ok


Selanjutnya saya akan masukan logo artwork berikut insert text kembali (tidak usah juga boleh, terserah masing masing saja)

dan inilah hasir akhir dari semuanya